In the roof shingle business, much has changed over the last 30 years. Shingles and installation processes have modernized. Most manufacturers are producing shingles with an inorganic fiberglass core whereas when my grandfather was roofing 35 years ago, the shingle core was composed mainly of organic fabric similar to a rag. The quality of asphalt with which they saturate the core is typically a much higher quality today, than it was years ago. Shingles are more modern, flexible, capable of handling greater temperature swings and processes are improved with production increased via the use of modern equipment such as roof nail guns and lifts. In order to be competitive, it has never been more important for a roofing company to be experienced and have on-site expertise on all aspects of both quality roofing techniques and modern improvements in production. The high quality roofing company understands that the lay-out of the shingle pattern and the nailing pattern translates to improvements in quality and production; or the shingle pattern and nailing pattern can lead to a decrease in quality and slower production also causing the potential for problems and leaks in the future. Obviously, increased shingle production can translate to lower prices for the consumer. For the most part, I am a fan of modern roofing materials as my first hand knowledge and experience leads me to genuinely believe that modern roofing products are more “forgiving” putting less burden on the roofer, and resulting in a tremendous increase in longevity and material quality when compared to the low-tech products of yesteryear. Shingle installation procedures are faster and better but with each new procedure also comes potential pitfalls that can backfire if an inexperienced roofer is in control. The roofing foreman must control the shingle layout and techniques from the very beginning of the job, and such expertise and attention will lead to increased productivity and roof quality; however the converse is also true that an inexperienced foreman who lays out the roofing and nailing patterns incorrectly will see a decrease in production and also can be building-in some pretty serious future roof defects. In the following paragraphs, I will explain the value of proper shingle lay-out as well as the value of quality nailing and proper nailing patterns; all of this should be innate and well embedded in the expert roofer to such a degree that the concepts are “second nature” and easy to deploy
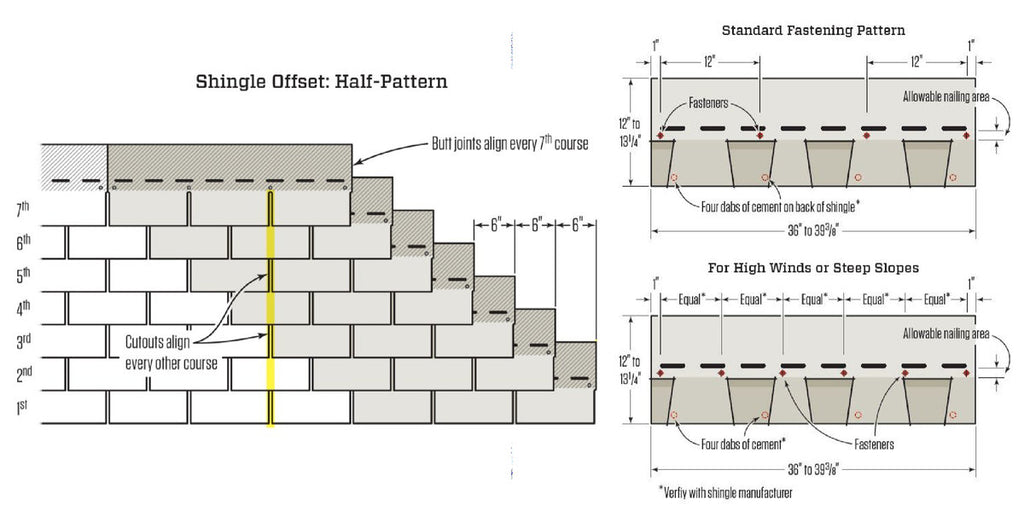
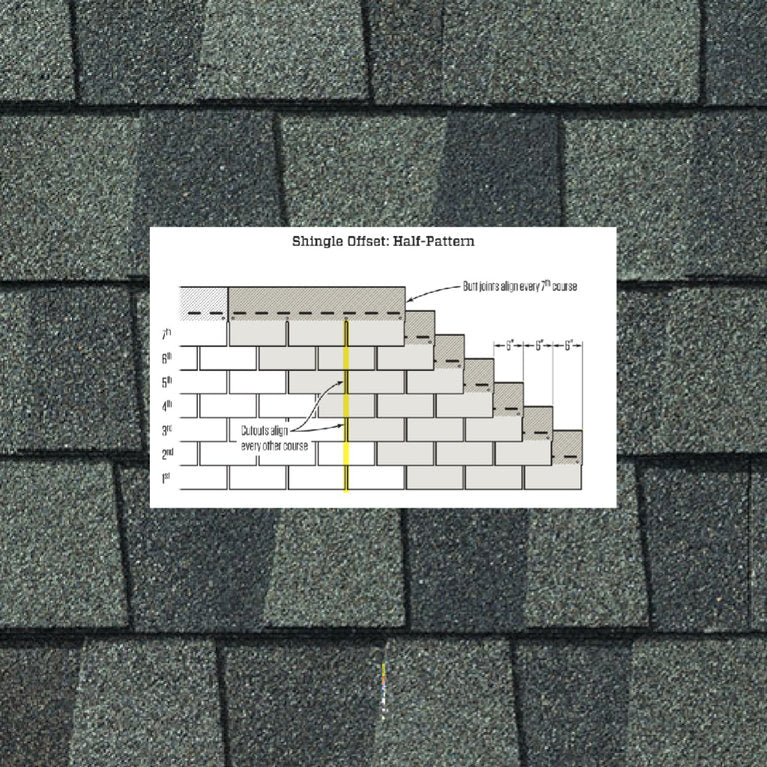
Shingle Pattern: There are many different styles of roof shingle but, for the most part, the installation pattern comes down to installing successive shingle courses, each of a certain predetermined exposure, installed in straight lines parallel to the bottom edge of the roof. Roof shingles keep buildings watertight based on the principle of overlap and the principle of gravity. Years ago, most shingles were 36 inches long by 12 inches wide. These days, many roof shingles are a bit larger to save on labor as they are one meter in length or 39.5 inches long and 13 inches tall. For simplicity sake, the remainder of this article will use examples of the traditional 36” x 12” shingle; although the same concepts can be applied to the larger 39.5” metric sized shingle. With modern shingles, successive courses of roof shingles are installed up the roof, starting at the bottom of the roof so that each additionally installed course of shingles is properly overlapping the prior installed course in a manner that sheds water. As the roof courses are installed up the roof, each additional course overlaps down over the prior course and this principle of overlap is what causes the roof shingle job to keep the building watertight. Each course of shingle is installed in a straight line; one after the other. Within the same course, the shingles are installed adjacent to each other such that the edges of each shingle within the same course do not overlap each other; rather within the same course each shingle is placed one after another such that there is an open joint between each shingle. Yes, water can leak into each open joint, however such water infiltration does not cause a roof leak because when water leaks into the joint of one shingle course, it comes out, and is shed by the previous lower course due to the principle of overlap. With a 36” shingle, each course is typically 5 inches; with a 39.5 inch shingle each course is typically 5 ⅝”. Traditionally, the size of the course was determined by taking the height of the shingle, subtracting the headlap which was usually 2 inches and then dividing the remainder by 2 (representing 2 courses). So for a 12 inch shingle, (12 -2)/2 = 5 inch course or exposure. This formula ensures that there will always be proper overlap plus an insurance policy of an additional 2 inches called the headlap, when a 5 inch course is installed. The successful roofer must lay out the courses in a straight and measured fashion because if the courses stray and the “exposure” of a course becomes wider than planned, there becomes less overlap than intended and leaks can occur. Laying out the shingle courses is “roofing 101” and pretty rudimentary so you would have to ignore measuring and install in a pretty crooked fashion to cause leakage from the course layout. Horizontally within each course, the shingles do not overlap the adjacent shingle to the left and to the right, rather those joints are butted together such that water is allowed to enter and run within that particular joint because that water is being shed by the preceding shingle course. Since water is allowed to run inside the joint, a major risk of leakage could come from two successive courses improperly installed with “joint over joint” or 2 successive courses with joints that are too close to each other. If joints are too close to each other, then the water that enters one joint can also flow into the next joint in the preceding course and by entering two joints, the water has penetrated both layers and therefore becomes a roof leak. Due to the fact that all of the shingles are the same length, when the roofer has completed one course and is beginning to install the next course that overlaps the preceding course, the first shingle installed in this newest course will determine the relative position of the shingle joints for the entire course. If the first shingle is placed with its joints too close to the joints on the preceding course, then every shingle on that course will also contain such a defect. The successful shingler and foreman understands this concept and also understands the most efficient layout of each course for both speed of installation and quality. A lousy layout creating joints too far from the previous course will cause extra reaching and a slowdown in production while a layout with joints too close to each other will cause quality issues and possible leakage. By understanding the manufacturer’s specified layout, the expert roofer installs the roof with a pattern that eliminates the thought that would be needed for each shingle. By understanding the rules and following (not straying from) the shingle pattern, the roofers can install with speed as well as the comfort and security that their discipline and layout allow them the luxury of not having to think about each shingle; rather they can get into production mode and install with speed and the knowledge that all is being installed in a long-lasting weather tight manner. Conversely, those who do not measure or follow a pattern, run the risk that successive joints are too close to each other and leaks can occur during extreme weather.


Nailing Pattern: Obviously, the roof nails are intended to hold the roof shingle in place during all weather and temperature conditions. Properly fastened shingles resist both high wind uplift damage as well as “slipping” which can occur when a very steep roof is fastened inadequately and gravity pulls the roof shingle out of place causing the nails to actually cut through the shingle as it slowly migrates slipping gradually downward. Keep in mind that during cold weather the shingle becomes hard and brittle and during hot sunny weather the shingle softens and weakens around the nail. It is not only the shaft of the nail, but also the compression of the nail head that creates the holding power. The cumulative effect of all of the nails working together is required for the strength of the roof. Roofs experience forces from wind and weather as well as expansion and contraction of the substrate (building) as the external temperature changes, so the purpose of the nailing pattern is to distribute all of the forces in an even manner across the entire roof so that no one area, shingle, or nail is experiencing greater force burden than any other. By utilizing an even and consistent nailing pattern, no single nail or shingle experiences undue force and the entire system bears the forces distributed evenly and therefore minimally. Most manufacturers and building codes require 4 roof nails per shingle or and enhanced 6 roof nails per shingle in high wind areas such as along the coast. Inexperienced roofers will boast of using more nails per shingle than other roofers, but what they are not telling you is that the location of the nails is equally as important if not more important than the number of nails. Four nails properly driven through the shingle will actually create a stronger wind protection than six or more nails improperly driven in the wrong locations. Many roofers like to nail shingles in a fashion that is as fast as possible. As you drive or walk near an ongoing roof job, you will hear the speed of the roof gun’s quick successive firing; bang bang bang bang bang bang. You can hear and count the number of nails per shingle, but extremely fast gun nailing is very difficult to aim. The way that these fast nailing roofers are able to install with such nail gun speed without installing nails too low (low nails would be visible on the exposed shingle and would be a future hole when the exposed nail eventually corrodes away) is that they are erring and installing the nails too high. Six nails placed too high on the shingle creates a far weaker roof than 4 nails placed properly low because the lower nails are stronger at wind protection. Higher nailing allows the wind to acquire leverage and lift the shingle causing wind damage while the lower nails are more centrally located on the shingle and the wind is not able to utilize leverage as it attempts to pry the roof off of the building. The quality roofer is willing to slow down the installation enough so that he or she can properly aim and install the nails in the locations specified by the manufacturer for optimal holding power. Additionally, the position of the nail must be such that the water that runs inside the shingle joint is not soaking the nail and causing undue corrosion or a leak through the nail hole. Roofers that do not use an intelligent nailing pattern that is based on the shingle joint pattern, will often find that the nails have been installed too close to the joints of the next course. The successful nailing pattern assures that water is not running on a nail and the intelligent layout and pattern allows the roofer to produce quickly without thinking about each shingle or each nail, all-the-while knowing that the predetermined pattern will not allow nails in risky places.
Nailing Quality: Modern roof nail guns require adjustments which control the depth or the pressure with which the nail is driven. The expert roofer understands how to adjust the equipment so that the nail is properly driven to a “flush” and compressed position of strength without over driving and weakening or breaking the surface of the shingle. Even the properly adjusted roof gun will over-drive or under-drive a nail from time to time as the roof boarding or plywood substrate may be less or more dense at different areas. The strength of the nailing pattern relies on the fact that each nail is doing its job so that the cumulative effect of all of the nails distributes the forces evenly and does not overburden any single nail causing it to fail. An over-driven nail breaks the surface such that the shingle could easily break away from the stationary nail head. An under-driven nail will be raised, will “ stick up” and will have no compression between the nail head and the shingle. Such raised nails are often referred to as being “proud” nails and can cause problems in more ways than one. Of course, the lack of compression will translate into less holding power, however the raised nail head can also cause leaks. Initially, the next course of shingles might lay flat supported by the proud nail, but that nail sticking up can cause serious future defects and even a leak. Initially, the next course of shingles will cover the raised nail head but as the heat of the summer bakes and softens the shingle, the overlaying shingle eventually becomes so soft that it settles around the raised nail eventually making a hole the exact size of the nail head. When you visit a roof that had raised nails left during installation, months or years later it appears that each of these proud nails had backed out leaving a hole when in reality the nail stayed fixed and stationary and it is the shingle that settled or melted around the nail. Further problems can be caused by raised nails because the the raised nail head holds the two pieces of shingle apart keeping the shingle sealant adhesive from properly contacting and adhering to the over-laying shingle. Proud nails cause a weakened nailing pattern, shingle holes causing leaks, and weakened adhesive which leaves the shingle susceptible to wind peeling. The expert roofer and roofing foreman is concerned about proud nails and constantly communicating to the crew and spot checking the completed work. The equipment can be properly adjusted so that the roofers will err on the side of quality. Over-driving the nails causes a definite problem, therefore the intelligent foreman will set the equipment so that it drives the nail either perfectly or the roof gun errs on the side of the under driven nail so that whenever a roofer sees he has left a “proud” nail, he or she simply should have the discipline to grab the hammer off of his/her belt and hit the nail to the desired flush position.
Roof shingle installations are not brain surgery, however the competitive and successful installation has many many moving parts. The definition of an expert might be that true professional who knows the roofing products, cares about the roof and the customer, and has the necessary expertise to strike that delicate balance between speed and quality. Good roofing companies with solid reputations typically have a long standing tradition of retaining true professionals that have the capacity to work hard and simultaneously know when to slow or stop production to correct a potential defect. Low quality companies might focus too much on speed while allowing or even ignoring defects; knowingly or unknowingly. Roofing is a tough business, and those companies with strong ethics are dealing with, and overcoming these issues on a daily basis. They build disciplines and habits that are deeply ingrained so they instinctively adjust to issues in a manner that are both productive as well as leading to a quality installation. Some of the roof problems do not reveal themselves until years after the job has been completed. There are many “on the job” decisions that affect the quality and longevity of the roof so when you choose a quality roofing company with a good solid reputation, you are also getting good decision making on your behalf.
Author - Alex O’Hanley has well over 20 years of experience in roofing and construction. He started, owned and operated Integrity Roofing LLC in Bristol RI for 16 years where they performed both commercial and residential roofing. Prior to that, he was Vice President of a local traditional roofing company and a Representative for a major manufacturer. He is a commercial and residential building envelope expert with hands on experience in all types of roofing including hot & cold built-up roofing, EPDM, PVC, TPO, sheet metal, flashing, shingles and slate. Currently, Alex is employed by GutterBrush Simple Leaf Guard explaining the benefits of a gutter guard that requires no tools or fasteners to install. You can email Alex at alex@gutterbrush.com.